![]()
(Third Edition)
by


email Computomarx
                      Dear Customer:

                      Congratulations on your choice of the
                      Computomarx System for track marking
                      calculations and drawings.  The Comput-
                      omarx System represents the most sophi-
                      sticated technology available in the
                      field.  However, it is of the utmost
                      importance that you read and follow these
                      instructions carefully as it is obvious
                      that any system is only as good as its
                      correct application.  Therefore, please
                      read the instructions thoroughly before
                      attempting to lay out and stripe a track
                      using the Computomarx system.

                                             Computomarx
Computomarx had its origin in the spring of 1975 when Dr. Wayne T.
Armbrust, president of Computomarx and then director of The Ohio Track
Club, was asked by a former OTC member to assist in marking a new track
facility at a local prep school from which the former member had
graduated. At the time, Dr. Armbrust was completing work for his Ph.D.
in theoretical high energy physics and was doing a great deal of work
on a digital computer. With this strong technical background in
addition to his track and field expertise, he decided to write a
computer program to perform the calculations associated with the task
of marking the track. The first program was written to mark that
specific track only. This program was very successful in that it
provided a convenient source of very accurate calculations that could
be used by people with little or no experience at track marking.
Shortly thereafter, The Ohio State University converted their outdoor
track from 440 yards to 400 meters, and Dr. Armbrust was asked to
assist in this task. The program was then modified to perform
calculations for tracks of arbitrary dimensions (length of straight,
radius of curves, width and number of lanes, and finish line location)
and used for the conversion calculations. At this time it became
apparent that the program had commercial possibilities; the term
Computomarx was coined as a trade name, and marketing of the system
began.
Over the years the Computomarx program has been greatly improved and
expanded from the original version. The first program, designed only to
mark one specific track, contained about 200 lines written in FORTRAN
66 (FORTRAN IV), while the present version of the program, which is
written using much more efficient programming techniques, requires
approximately 7100 lines of FORTRAN 77 (VS FORTRAN) code.
The present version of the program is capable of calculating the
location of all markings for outdoor or indoor metric tracks of
arbitrary length and dimensions, or metric markings on yard tracks, and
producing a color scale drawing of the track at the same time. The
calculations and drawings are color coded using the recommendation of
International Amateur Athletic Federation (IAAF) and adopted by the
National Collegiate Athletic Association (NCAA) and the National
Federation of State High School Associations (NFSHSA). The program
locates all staggers, including those requiring a break to the pole
after running a portion of the race in lanes, all relay exchange zone
marks, marks for all hurdle races, and split locations every 50 m
around the track. Two exclusive Computomarx features are: (a)
Mathematically calculated arc starting lines, and (b) three types of
steeplechase paths from the track to the water jump all of which
smoothly join to the track and water jump. For marks located on curves
there is the option of chord or angle measurement. Linear output from
the program can be either in meters or in feet, but all calculations
are performed in meters. Other program options are separate hurdle
lanes and staggers when the regular lanes are too narrow to set hurdles
in them, the capability to mark straightaway events on the back
straight in either direction and home straight events finishing at
locations other than the common finish, optional relay race data
including number of turns to be staggered and additional races, alley
starts for distance races, and calculations and marks for youth hurdle
events with a variety of spacings. Other features are described in
appropriate sections of this manual.
Calculations and drawings are generated on the basis of inputs from the
form "TRACK SPECIFICATION SHEET" which is completed by the customer.
This form is included as an appendix at the end of this instruction
booklet for the customer to copy and complete. Inputs which are not
self-explanatory are discussed in detail in the appropriate section of
the booklet.
The Computomarx track marking system allows users a choice of either
angle measurement or chord measurement for locating markings on the
curves. Chord measurement, the straight line distance between two
points on a curve, allows the entire track to be surveyed with no
equipment other than a tape measure. Angle measurement, in which angles
can be turned either clockwise or counterclockwise, requires the use of
a transit or theodolite. Accurate results can be obtained by either
type of measurement, although the accuracy of chord measurement depends
upon the correct location of the lane lines, especially for longer
chords. It is important when using a tape for any type of linear
measurement to use the appropriate temperature correction for the tape
being employed. Temperature correction becomes more important, of
course, the longer the measurement being made.
Straightaway measurements and curve measurements using chords are in
meters or feet as desired, as indicated on the printout. It is
recommended that linear output be specified in meters. Track and field
athletics is a totally metric sport, and all rules for measurement are
specified in meters. Specifying output in meters and doing all
surveying metrically eliminates the inevitable round-off errors
associated in converting from one measurement system to another. The
IAAF and NCAA require that all track and field facility construction
use metric measurements. Please refer to Fig. 1 in the section below
for an illustration of the method of locating all markings.
A. STRAIGHTAWAY MEASUREMENTS
All straightaway measurements are made from the nearest of the four
reference lines A, B, C, or D, where the curves and straightaways join,
shown in Fig. 1. By convention, D is coincident with or near the
finish. Positive numbers on the printout indicate measurement in the
direction of running (counterclockwise), while negative numbers denote
measurement opposite the direction of running (clockwise). For example,
in Fig. 1, s is a positive straightaway measurement in lane 3 from
Reference Line C.
Following the number for each measurement on the printout is the
reference line from which the measurement is made. Calculations are
output to thousandths of a meter (millimeter) when output is in meters
and to hundredths of a foot when output is in feet. An example of an
output for a straightaway measurement with metric output might be
"-23.341 B", which is interpreted "23.341 meters back along the
straightaway from Reference Line B."
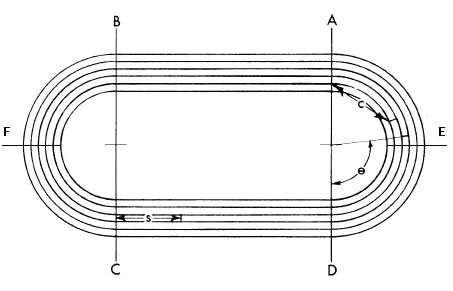
Fig. 1. The Measurement System
Measurement for locating starting and finish lines for the straightaway events and marks for locating hurdles in the sprint hurdle events is made using the same convention. If a straightaway mark is located in a chute, either ahead of or behind a reference line, this fact is indicated by an ampersand (&) appended after the reference line.
B. CURVE MEASUREMENTS
1. CHORD MEASUREMENT
Using chord measurement, markings are located on curves using the four
reference lines defined in Section II, A. Additionally, to avoid errors
resulting from excessively long chords, additional reference marks,
called Additional Reference Lines, located at the apexes of the curves
may be specified by the customer. Additional Reference Line E is
located at the apex of the first curve and F at the apex of the second,
as illustrated in Fig. 1. If this option is used, no chord will ever be
longer than approximately 30 meters or subtend an angle greater than 45
. Using this option, the angle between a chord and lane line will never
be greater than 22.5 . This will increase accuracy by reducing the
dependence on lane line location precision at the point of measurement,
since overall precision depends on the accuracy of the lane line
location times the sine of the angle between the chord and the lane
line.
Whether or not Additional Reference Lines are used, measurement is
always to the nearest reference line. As in Section II, A, positive
numbers indicate measurement in the direction of running, negative
numbers indicate measurement opposite the direction of running. In Fig.
1, c is a negative chord measurement from Reference Line A in lane 2.
Chord measurement outputs are made with exactly the same format as
straightaway outputs. Thus, a chord measurement output in meters of
"13.127 D" would be understood as "a chord of 13.127 meters in the
direction of running from Reference Line D."
All chord measurements are made between points on the inside
theoretical lane line (which corresponds to the outside edge of the
curb, if any, of lane 1, otherwise the outside edge of the inside
painted line) of the lane in question. It is possible to locate marks
on the curve using chord measurement before the lane lines are painted
by using two tapes, one measuring the chord and the second measuring
the radius from the center. This method will eliminate errors due to
misplaced lane lines. It is more convenient, however, to locate marks
after the lane lines are painted.
For cinder or other non-synthetic tracks, follow the same procedure
as above, taking special care to lay down the lane lines as the
accuracy of their placement will determine the accuracy of the marks on
the track from that point on. After the markings are located, run
a line from the center of the curve (or the center of the relevant
portion of the curve if the track has a compound curve) to each mark in
its lane, and make a mark where the line intersects the curb. The
marks on the curb should be made permanent using plaques or monuments
that are commercially available. When relining the track, run a
line from the center of the curve through the permanent marker to the
lane in question and place the marking.
2. ANGLE MEASUREMENT
Angles may be measured either counterclockwise from Reference Line B or
D, or optionally, clockwise from Reference Line A or C, as desired.
Logically, angles should be measured counterclockwise since this is the
direction of running. However, many theodolites measure angles only
clockwise, which makes it necessary that output from the Computomarx
program correspond. In Fig. 1, theta
is a positive angle from Reference Line D in lane 3. The format
for angle measurement on the printout in degrees, minutes, and seconds
is
of the form ddd mm ss R, with ddd the degrees, mm the minutes, ss the
seconds, and R the reference line. In gradian (gons) measurement
output is given to four decimal places. As in the case of
measurements on
the straightaway in Section II, A, positive figures indicate angles in
the direction of running (counterclockwise) and negative figures
indicate angles opposite the direction of running (clockwise). For
example, "121 13 44 B" would be read as "an angle of 121 degrees, 13
minutes, 44 seconds counterclockwise from Reference Line B and
-151.1456 A would be read as 151.1456 gradians clockwise from Reference
line A."
Marks set using angle measurement do not necessarily have to be placed
wholly in their respective lanes, except for tracks with compound
radius curves, discussed in Section VIII. Therefore, if the track has a
simple curve, marks can be set using angle measurement before the lane
lines are painted.
For cinder or other non-synthetic track, place a mark on the curb
instead of on the lane line and mark it with a permanent plaque or
monument. When relining the track, run a line from the center of
the curve
through the permanent marker to the lane in question and place the
marking.
III. LOCATING CENTERS OF CURVES AND
REFERENCE LINES
Locating centers of curves and reference lines are critical procedures
upon which the accuracy of all other measurements depend. Therefore,
when using a tape for these determinations, remember to use the proper
temperature correction. It is recommended that an electronic distance
meter (EDM) be used when available, to set, after preliminary
measurement with a tape, the distance between centers of curves and the
radii of curves at the location of reference lines.
A. LOCATING THE CENTERS OF CURVES
It will be necessary before any facility can be surveyed and striped to
either locate the centers of the curves, if their location is unknown,
or to check their location if these points are known approximately. The
procedures outlined in this section are for tracks with simple curves.
For tracks with compound radius curves, the information in this section
must be used in conjunction with the material in Section VIII.
1. CURVES WITH UNKNOWN CENTERS
To determine the center of one curve of a new facility which has no
lane lines or curb present, first select two points on the curve spaced
well apart, close to and approximately the same distance from the inner
edge of the track surface, making sure that the points so chosen allow
room on the surface for the paint machine to clear any obstacles. Then
scribe arcs at the apparent center with radii equal to the inside lane
radius for lane one as given by the Computomarx printout from both
points. The intersection of these arcs locates the center of this
curve. If the facility already has a curb or lane lines, proceed in the
same way except choose the points on the outer edge of the curb, if
present, or outer edge of the innermost lane line.
It will then be necessary to check whether lane lines can be painted on
the track with the center thus located in the case of a facility with
no lane lines present, or whether the lane lines present have been
painted in the correct location for a facility with lane lines in
place. If no lane lines are present, the radii for the first lane and
for the outside border must be checked to make sure that these
semicircles are on the track surface all the way around with room on
the inside and outside edges for the paint machine to clear any
obstructions. The procedure for locating the center may need to be
repeated one or more times for proper positioning. If lane lines are
present, it will be necessary to check the radius of each lane line
about the center just established. If the existing lane lines have not
been painted in the correct place, it will be necessary to obliterate
them and paint new lines.
The center of the second curve is located in a slightly different way.
From the first center just determined, swing an arc of radius equal to
the length of the straightaway. Then scribe an arc of radius equal to
the inside lane radius for lane one drawn from a point near the inside
edge of the track, if no lane line or curb is present, or from the
outer edge of the curb, if present, or outer edge of the innermost lane
line if existing lines are present. The intersection of these two arcs
determines the location of the center of the second curve.
This center will also have to be checked to see, in the case of a
facility with no lane lines painted, if it can be used to paint lines
on the surface, or, in the case of a facility with existing lane lines,
if the lines are properly painted. In the case of a facility with
existing lines, there is the possibility that the two arcs described
above do not intersect. If this happens, it will be necessary to
obliterate the lines and repaint them.
2. CURVES WITH CENTERS KNOWN APPROXIMATELY
If the facility has no existing lane lines, first check one curve to
make sure that lines can be painted on the track surface, as described
in Section III, A, 1. If lines cannot be painted on the surface, a new
center for this curve will have to be determined as outlined in Section
III, A, 1.
If the facility has existing lane lines, the radius of each about the
trial center must be checked to see if it is properly painted. Any lane
line not properly painted will have to be obliterated and repainted.
When the center of one of the curves is correctly established, check
the distance to the other center to see if it is the same as the length
of the straightaway. If it is not, the second center will have to be
located in the same manner as for tracks with unknown centers in
Section III, A, 1. When the second center is established, it will be
necessary to check facilities with no existing lane lines to see if
lines can be painted with this center, and facilities with existing
lane lines to see if they are correctly painted, as in the case of the
first center.
B. LOCATING REFERENCE LINES
New or existing facilities may have the four points where the curve and
straightaways join marked by the track installer. If this is the case,
we would still suggest that you follow the procedures outlined below as
a check. Methods for locating reference lines by means of either a
surveying instrument or a tape are given below. Whenever possible, even
if chord measurement is used for locating markings on the track,
reference points should be set with an instrument, as this method will
produce greater accuracy and is much easier to use.
1. LOCATING REFERENCE LINES WITH A TRANSIT OR THEODOLITE
To locate reference lines with a theodolite, first set up the
instrument on one of the centers established in Section III, A. Then,
sight on the opposite center. If Alternate Reference lines are desired
for chord measurement, sight past the opposite center and place a mark
on the inside and outside of the track. Next, turn angles exactly 90 to
either side of the line joining the two centers, placing markings on
the inside and outside of the track on both sides. Repeat the above
process at the opposite center. Snapping a chalk line between the
points on the inside and outside of the track at all four corners (and
apex of curves, if these lines are desired) completes the task of
locating the reference lines.
2. LOCATING REFERENCE LINES WITH A TAPE
If chord measurement is selected as the method of locating points on
the curve, the Computomarx program gives two methods of locating
reference lines. These methods should be viewed as secondary to the
method of locating reference lines with a surveying instrument.
However, if care is used and temperature corrections for the tape are
properly made, these methods can produce acceptable results.
Fig. 2-A illustrates the first method. Locate the midpoint between the
centers using the "HALF STRAIGHT" measurement given in the printout.
From one center, swing two arcs, one of radius equal to the inside
radius of lane one, the other equal to the outer border, on one side of
the track at the location where the curve and straight appear to join.
From the midpoint between centers swing arcs equal to "INNER EDGE" and
"OUTER EDGE" under "HYPOTENUSES FROM MIDPOINT" given in the printout.
Locate markings at the intersection of the lane one radius and the
"INNER EDGE" radius on the inside edge of the track and at the
intersection of the outer border and "OUTER EDGE" radii on the outside
edge of the track. Repeat this procedure on the opposite side of the
track. This entire procedure is then repeated at the other center.
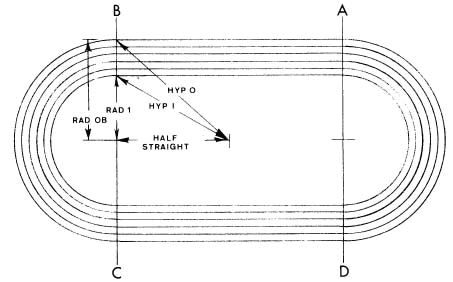
Fig. 2-A. First Method of Locating Reference Lines With Tape

Fig. 2-B. Second Method of Locating Reference Lines With Tape
Fig. 2-B illustrates the second method of locating reference lines
with a tape, which is very similar to the first. Using this method the
reference lines are located using the intersections of arcs for lane
one and the outer border from one center with arcs drawn from the
opposite center equal to "INNER EDGE" and "OUTER EDGE" respectively
under "HYPOTENUSES FROM OPPOSITE CENTER."
The first method will probably be used for outdoor tracks with
straightaway distances of 90 m or more due to the unavailability of
tapes more than 100 m long. The second method can be used for tracks
with shorter straightaways or for indoor facilities.
For reasons explained in Section II, B, 1, the use of Alternate
Reference Lines is strongly recommended when measuring using chord
measurement. While it is best that Additional Reference Lines be
located with a theodolite, it is possible to locate these lines using
only a tape if care is taken. In Fig. 3, Additional Reference Line E is
found at the point where chords shown in the illustration as ch
intersect. The length of these chords is given in the printout as
"CHORDS TO ADDITIONAL REFERENCE LINES" in "SURVEYING INFORMATION." As a
double check, determine that the point of intersection is located a
distance equal to the lane one radius from the center (shown in the
illustration as r1). To complete the location of Additional Reference
Line E, extend a chalk line from the center of the circle through the
point just established to the outer edge of the track. Finally, snap
the portion of the line between the track's inner and outer edges.
Repeat the above procedure at the other end to locate F.
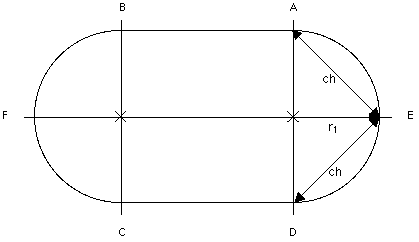
Fig. 3. Optional Additional Reference Lines (E and F)
The job of locating the reference lines is completed by snapping a
chalk line between the markings on the inner and outer edges of the
track at the location of lines A-D.
IV. METRIC CONVERSIONS AND ODD SIZE TRACKS
A. METRIC CONVERSION
One of the most common consulting tasks performed by Computomarx is to
convert a 440 yd. outdoor track to 400 m or a 220 yd. indoor track to
200 m. Except in the case of indoor facilities with synthetic material
covering the entire fieldhouse floor, the easiest and most economical
way to effect metric conversion, the method requiring the least amount
of excavation and materials, is to retain the same radius for the
curves but shift one of the centers so that both
straightaways are shortened. Since both straightaways are shortened,
the amount that the center is shifted is half the difference between
440 yd. and 400 m, or 220 yd. and 200 m, with a slight correction. This
correction is due to the fact that yard tracks were measured with their
measure line 12 inches from the curb, or 8 inches from the inside lane
line if no curb was present. Metric tracks, however, are measured 30 cm
from the curb or 20 cm from the inside lane line. The fact that 12
inches is 30.48 cm, instead of 30 cm is the reason for this correction
in converting a yard track.
If a track is converted by shifting one center, it is possible that the
lane lines on the straights and the corner not shifted will be usable.
They should be checked for accuracy, however. Because of the way that
the measure line is defined in the two systems, staggers, exchange
zones, intermediate hurdle marks, etc., will not be usable on
the unaffected part of the track.
B. ODD SIZE TRACKS AND METRIC MARKINGS ON YARD
TRACKS
The Computomarx program is capable of performing calculations for
tracks of arbitrary length, indoors and out. There are, however, three
problems associated with outdoor tracks of length other than 400 m or
indoor tracks of length other than 200 m. The first problem is that
these facilities will no longer be able to use a single non-staggered
relay exchange zone (explained in Section VII, B) for all indoor relay
exchanges except the optional 4X200 m and all except the 4X100 m, 4X200
m, first exchange of the 4X400 m, and first two exchanges of the
optional sprint medley relay outdoors, as is the case with a standard
length track. The Computomarx program performs the calculations for
these additional exchange zones which must be placed on the track for
these installations.
The second problem is that in general a separate arc starting line will
be required for all distance races. No longer will the same line work
for both the 3000 m flat and the 5000 m, for example. The Computomarx
program calculates the location of and the coordinates for all required
arc starting lines.
The third problem is that all coaches and runners like to know split
times in distance races, and want splits for intervals of 200 or 400
meters. In order for standard splits to be given on odd length tracks,
the Computomarx program calculates split locations every 400 m for
races up to 10,000 m outdoors and every 200 m for races up to 5000 m
indoors.
It is easily seen that 440 and 220 yd. tracks with metric markings are
nothing more than special cases of odd length tracks, and are so
treated by the Computomarx program.
For indoor tracks of length less than 200 m or outdoor tracks with laps
less than 400 m, the Computomarx program calculates the location of a
line, out from the first lane, which will make a lap of 200 or 400 m,
provided that this line will be located greater than two meters inside
of the outer border. If this lap line is calculated, arc starting lines
for distance races to be run using the new line are also calculated.
V. PAINTING
The Computomarx program calculates the location of the theoretical lane
lines, starting lines, finish line, etc. It is necessary, of course,
that there be a visible, painted, line on the track corresponding to
each theoretical line. The visible lane lines, starting lines and
finish lines have a width of 5 cm, and are normally painted white.
When painting lane lines, first keep in mind that the outer
edge of the visible lane line corresponds to the theoretical lane line
computed by the Computomarx program. To paint the curves, mark the
inside lane radii in each lane together with the outer border using a
tape from the center. Either mark a continuous line all around the
curve, or mark at least 50 points evenly spaced for each lane so that
an accurate semicircle can be painted by the paint machine. To paint
the straightaways, snap a chalk line stretched between the
intersections of the respective lane radii and the reference lines at
each end of a straight. Paint with the outer edge of the paint line
coinciding with the chalk line. It is best to paint each lane line
continuously, completely around the track without interruption, to
avoid any discontinuity in the line.
Note that the theoretical lane lines are different from the measure
line, the line along which measurement of the lane is made. For the
inside lane, the measure line is located 30 cm outward from the curb,
if one is present, or 20 cm outside the outer edge of the innermost
lane line if no curb is present. The measure line for all other lanes
is located 20 cm outside the outer edge of the inside lane line of the
particular lane.
When painting staggered starting lines, finish lines, relay exchange
marks, and hurdle marks it is important that the visible lines are
painted at right angles to the lane lines. To get marks located on the
straights square with the lane lines, measurement should be made on
both sides of the lane. For marks located on curves, run a chalk line
from the center of the curve through the point determined by the
methods of Section II, B, and snap it across the entire width of the
lane. In order to achieve sharp, well defined lines, it is strongly
recommended that these markings be painted with the aid of a stencil or
masking tape.
For all starting lines, the edge of the visible line further back (in
the sense of the direction of running) from the finish corresponds to
the theoretical starting line. The edge of the visible finish line
nearer to the start corresponds to the theoretical finish line.
In painting relay exchange zones, the symbols denoting the area in
which the baton pass must take place, called in the Computomarx program
the exchange marks and the limit marks
, are painted so that these marks are contained within the zone (i.e.,
so that the edges of the visible marks furthest from the center of the
zone correspond with the theoretical lines). These exchange marks and
limit marks are sometimes denoted by large blocks, triangles, or other
devices, but chevrons are preferred by the IAAF. In any case they are
painted inclusive within the zone. The lines denoted in the Computomarx
program as mid marks
, the marks from which splits are taken, should be painted like a
finish line with the edge nearer the start corresponding to the
theoretical line. The mark called in the Computomarx program the fly
mark
, the distinctive mark or device denoting the point at which runners in
the 4X100 and 4X200 meter relays (and first two legs of the sprint
medley) may commence running, should be painted so that the edge
furthest from the center of the zone corresponds to the theoretical
line. It is suggested that a smaller version of the device used for
exchange marks and limit marks be used to denote the fly mark.
Unless the U. S. High School events only option is selected, relay
exchange zones are denoted on the drawing by chevrons. When the option
is selected, the exchange zones are drawn using triangles. Also, unless
this option is selected, automatic timing lines, i.e., dashed lines
each meter for five meters back from the finish are placed on the
drawing.
For all tracks it is recommended that the IAAF color code be used. This
color code has been adopted by the NCAA and the NFSHSA and is used for
the plots generated by the Computomarx program with the colors for each
mark printed on the calculations
VI. ARC STARTING LINES, ALLEYS, AND BREAK
LINES
One of the unique features of the Computomarx program is calculated arc
starting lines and break lines. Arc starting lines, which in general
are used for races of 1500 m or longer, are computed (or constructed in
the case of tracks marked without the aid of the Computomarx program)
in such a way that each runner, no matter where he is positioned on the
arc at the start, runs the same distance. Each runner will run the same
distance for the entire race if he runs in a straight line from the arc
line to the point of tangency with the measure line located on the
curve at the start of the race, or the first curve encountered by the
runners if the start is on the straight, and then stays on the measure
line for the remainder of the race.
In some cases, the most common of which is the arc line for the 1500 m
on tracks with straightaways less that 100 m or where the common finish
line is not at the end of the straightaway, calculation of the arc line
is more complicated. In these cases, the arc starting line will be near
the end of the curve. Runners lining up near the curb will run to a
point of tangency on the curve on which the arc line is located.
Runners lining up farther away from the curb, beyond where the line
extends out past the point of tangency between the curve and the
straight, will run to a point of tangency on the opposite curve at the
end of the straight. The Computomarx program automatically shifts
calculations for the arc starting line in these cases from the curve on
which the starting line is located to the opposite curve as the
calculation proceeds out from the curb. Therefore, even in these cases
the arc starting line is calculated to insure that each runner runs
exactly the same distance.
Assembly lines are dashed lines three meters back from the arc starting
lines, where the runners assemble prior to the command "On your marks."
Assembly lines are omitted when the "U. S. High School Events Only"
option is selected.
Alleys are auxiliary curved lines which permit a larger than normal
number of runners in distance races such as the 3000 m, 5000 m, and
10,000 m, or more competitors than lanes on the track in the 800 m.
Calculations for alley starting lines are in the same format as other
curved lines and are marked on the track in a similar fashion. The
first alley is identical to the standard curved line and has its origin
in the first lane; subsequent alleys have their origins in the lanes
indicated as the inner border on the calculations at the indicated
positions. If alleys are desired, there must be at least two but no
more than a number equal to half the number of lanes. For example, a
nine lane track may have two, three, or four alleys. Successive alleys
have their inner borders a number of lanes apart equal to the nearest
integer to the number of lanes divided by the number of alleys.
Therefore, a nine lane track with three alleys will have alleys with
inner borders in lanes one, four, and seven. When alleys are used,
runners must remain in them, i.e., not go inside the lane denoted as
the inner border, for one or two turns (until the appropriate break
line is reached) before moving to the inside. Outdoor tracks which
incorporate alleys will need a break line at reference line C as well
as the standard one at A for use by runners in the 3000 m and 5000 m
races. If two turn alleys are selected, the break line at C will be
necessary even for tracks marked for U.S. high school events only.
A break line is nothing more than an arc starting line located at the
beginning of a straightaway, denoting the point at which runners may
leave their lanes in races which are run in lanes for only part of the
event. Examples of events of this type are the 800 m run and the 4X400
m relay both indoors and out, plus the 400 m, 500 m, 600 m, and 1000 m
indoors. To insure that each runner covers the same distance in races
of this type, an additional distance equal to the curvature of the
break line at the location of the measure line in each lane is
incorporated in the staggers beyond the normal stagger for the number
of turns the competitors stay in their lanes. Calculations for staggers
for races of this type are another exclusive Computomarx feature and
are possible only because of the capability to calculate arc starting
lines mathematically.
Break lines start in lane two rather than lane one, because a runner
starting in lane one stays there. Break lines located at the beginning
of the home straight which are used only for a break from alleys begin
at the inside of the second alley.
In the case of runners breaking from an alley which divides the
track into two equal or nearly equal parts and where runners are not
breaking from lanes at the same point, no break line is used.
Instead, a 5 cm x 5 cm square is used to mark the break point, and a
cone is placed on the square at the start of the race. An example
of when this square replaces the break line is a one turn staggered
alley for the start of the 5000 m consisting of lanes 5-8 on an eight
lane track. The square is painted on the lane line indicated with the
edge of the square nearest to the finish at the position shown on the
calculations.
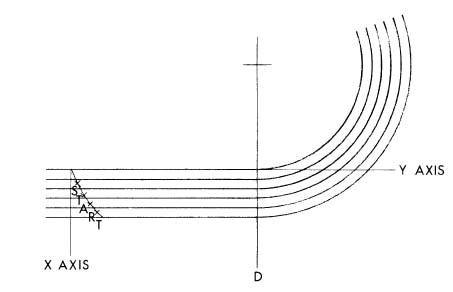
Fig. 4. Laying Out the Arc Starting Line
It is very easy to lay out and paint an arc line using the
calculations provided by the Computomarx program. First, construct a
line perpendicular outwards from the curb, if present, or inside lane
line at the location shown on the Computomarx printout. To construct
the perpendicular line on a straight, measure the distance along both
the curb or inside lane line and the outer border and snap a chalk line
between the points. If the line is to be located on a curve, run a
chalk line from the center of the curve through the location determined
for the line by the Computomarx program and snap it across the width of
the track. Fig. 4 illustrates the coordinate system used for arc lines.
The origin or point (0,0) of the coordinates given on the printout for
each arc line is the intersection of the perpendicular with the curb or
outer edge of the inside lane line. The X coordinates given by the
printout are measured out along this perpendicular. Y coordinates are
measured along a line perpendicular to the X axis, running outward from
the origin in the direction of running. We suggest the use of a large
square or right triangle to insure that Y coordinate measurement is at
right angles to the X axis.
There are are two y axis values for each x axis value when assembly
lines are calculated. One, labeled "solid", is the starting line
itself; the other, labeled "dashed", is the assembly line.
One method of painting an arc starting line is to lay out the
coordinates on the track using a felt tip pen or other similar device,
and then to paint a line connecting them. A better way, to insure
greater precision and sharper lines, is by means of a tape machine with
the distance between tape strips set at 0.050 m (5 cm). The visible
starting line would then be painted between the two tape strips, taking
care to form as smooth curves as possible with the tape machine.
VII. RELAY EXCHANGE ZONES
Two types of exchange zones are used for relay races. The two types are
staggered zones
and non-staggered zones
.
A. STAGGERED EXCHANGE ZONES
Staggered exchange zones are used for relay races in which runners must
complete one or more exchanges in a particular lane. Relays using
staggered zones are all three zones for the 4X100 m and 4X200 m relays
outdoors, the first exchange for the 4X400 m relay outdoors (if
staggered, see Section X, C) and 4X200 m relay indoors, and the first
two exchanges for the sprint medley relay. For each zone of the 4X100
and 4X200 relay and the first two zones of the sprint medley, four
marks are required in each lane. These marks, which are defined in
Section V, are the fly marks
, exchange marks
, mid marks
, and limit marks
. The first zone of the 4X400 requires only three marks per lane, no
fly zone being used in this event.
Since the third exchange zone of the 4x200 m relay is the same as the
second zone for the 4X100, this data is not repeated in the printout.
Likewise, the second zone of the sprint medley is the same as the first
zone of the 4X400.
B. NON-STAGGERED EXCHANGE
ZONES
Non-staggered zones are used for all other relay exchange zones, and in
these, the runners are not constrained to stay in any particular lane
during the exchange. Fly zones are not used for non-staggered zones,
except the second and third zones of the 4X200 m indoors (Section X,
C). Except in the case of odd length tracks or for the 4X1500 m relay,
discussed in Sections IV, B and X, C, respectively, only one
non-staggered zone is required. For odd length tracks, all additional
zones required are calculated. Note that even for odd length tracks,
the third zones of the 4X800 m and sprint medley relays are the same as
the second zone of the 4X400, and the first and second zones of the
4X800 are the same as the second and third zones, respectively, of the
distance medley (assumed run in the order 1200-400-800-1600).
Since runners are not running in lanes during these exchanges, marks
are not painted in lanes, but are painted across the entire width of
the track. If a data item for a mark appears with no reference to lane
number, a line is placed the width of the track at that point. If a
data item is given for each lane, a single line is drawn across the
track connecting the points in each lane. Non-staggered zones are
constructed so that regardless of the distance out from the curb or
inside lane line, the distance from the mid mark of the zone to the
exchange and limit lines on either side is exactly ten meters, assuming
a constant distance from the curb is maintained. This construction,
which insures that all runners will have the same distance in which to
complete an exchange, results in zones having exchange lines and limit
lines parallel or almost parallel to the mid mark line in all cases.
Only in the case where both the mid mark and the exchange or
limit mark is on the straight will a particular exchange or limit line
be at right angles to the lane lines.
If an exchange mark or limit mark of a non-staggered zone is located on
a curve, but the mid mark of the zone is less than 10 m into the curve,
chord measurement is used for that mark even though angle measurement
is used to locate all other points. This is done for ease of
measurement and will not degrade accuracy since all such chords will be
short.
VIII. TRACKS WITH COMPOUND RADIUS CURVES
In the spring of 1982 Computomarx received a major challenge when it
was awarded the contract to perform the calculations for the Jesse
Owens Track in Ohio Stadium at The Ohio State University. The design of
this track, as well as many other tracks around the country, features
compound radius curves. Compound radius curves of the type handled by
the Computomarx program are curves which start out with one radius for
the curve, switch to a second radius, and then back to the original
radius, such that the angles to the point of change in radius measured
from the beginning and the end of the curve are equal. Compound radius
curves may be of two types: The first, illustrated by Fig. 5-A, has the
larger radius at the ends of the curve, while the second, illustrated
by Fig. 5-B, has the larger radius in the center. A special case of the
second kind of compound curve is when the angles at the ends are each
90 with a short straight section joining the two curved segments. This
situation may be thought of as one in which the center curve has an
infinite radius.
There are several differences in the method of measurement, locating
centers of curves, locating reference lines, and painting in the case
of facilities with compound radius curves from tracks with simple
curves. There is no change, of course, in locating marks on the
straights, nor is there a difference in locating marks on curves when
chord measurement is used. The Computomarx program calculates the
correct chord length, even when the ends of the chords are on portions
with different radii. If angle measurement is employed, the instrument
is not set up on any of the three centers. Rather, it is located at the
mid point of the line joining the opposite side centers, at the point
labeled M in both Figs. 5-A and 5-B. The Computomarx program
automatically calculates angles about this point for marks located all
around the compound curve. This means that it is not necessary to shift
the instrument while traversing the curve, just as though the curve had
a single radius. With compound radius curves it will be necessary,
however, to set marks on the outside edge of the inside lane line (or
outer edge of the curb, if present, for lane one) of the respective
lanes.
Fig. 5-A. Type One Compound Curve
It will be necessary to use a transit or theodolite to locate the
centers for tracks with compound radius curves. While it is
theoretically possible to locate all three centers without a
theodolite, Computomarx feels that the process is too complicated and
that there is too much chance for error to risk mislocating these
points, the correct locations of which all the markings on the track
depend, to attempt to locate the points with a tape. In the process of
locating the centers, the reference lines will also be established.
Fig. 5-B. Type Two Compound Curve
To locate the centers, first locate a center of an end portion of one
of the curves, the center labeled C1 in Fig. 5-A or 5-B, and the center
of the end portion of the curve at the opposite end of the track which
is on the same side, using the method of Section III, A. To obtain the
center C1, use the data under "INSIDE LANE RADII, FIRST RADIUS" In the
printout. Next, locate the reference lines at the end of the track
where the instrument is located using the method of Section III, B, 1.
Additional Reference Lines for chord measurement, if desired are also
established using the method of Section III, B, 1. With the instrument
pointing either along the radius running from the center to the
reference line, or 180 from this direction, depending on whether the
sign of the quantity "DISTANCE BETWEEN OPPOSITE SIDE CENTERS" in the
printout is positive or negative, respectively, measure a distance
equal to the magnitude of this quantity. The sign will be positive for
tracks configured as in Fig. 5-A and negative if configured as in Fig.
5-B. The measurement, labeled D1, just made establishes the center for
the other end of the curve, labeled C1', in Fig. 5-A or 5-B. Measuring
half of the distance just measured, in the same direction, establishes
the point M. This distance to the point M is called " FIRST RADIUS TO
MID POINT DISTANCE" in the printout and is labeled D2 in the figures.
Next, except for tracks having curves with a straight section in the
center, in which case this step is omitted, proceed to locate the
center for the middle portion of the circle, labeled C2. From the line
running from the first center along the radius to the reference line,
measure an angle equal to "ANGLE TO SECOND CURVE" in the printout
(labeled A in the figures) or that angle plus 180 , depending on
whether "RADII DIFFERENCE" is positive or negative, respectively. Again
the sign will be positive for Fig. 5-A type tracks and negative for
Fig. 5-B type tracks. Finally, measure a distance equal to the
magnitude of "RADII DIFFERENCE" in the direction of the angle just
determined. This last distance is labeled D3 in the figures.
Occasionally, a track with a compound radius curve will be encountered
with an extremely large radius for either the end or center portion.
Tracks of this type pose a special problem. If they are of Fig. 5-A
type the centers C1 and C'1 will often be covered by stands. In either
case the radii may be longer than any tape commonly available. The
Computomarx program has special routines to handle these types of
tracks.
If the track is of Fig. 5-B type with a large center portion radius,
locate centers C1 and C'1, the point M, and the reference lines as if
the track had a straight section in the center of the curve. If the
track is of Fig. 5-A type with large radii at the ends, first locate
radius points C2 at both ends, using the procedure of Section III, A.
With the theodolite set up over one radius point, sight on the radius
point at the opposite end. The location of the mid point M is found by
measuring a distance equal to "SECOND RADIUS TO MID POINT DISTANCE"
from C2 along the line joining the two radius points. The reference
lines are located by setting the instrument over the points M at either
end and turning a 90 angle on either side of the line joining them. To
locate the lane lines on the portion of the curve with the large
radius, use the data "FIRST (SECOND) CURVE INSIDE LANE RADII FROM MID
POINT." Measure radii for each lane from the point M for each pointing
around the large radius portion(s) of the curve.
As in Section III, A, it will be necessary to check to be sure lane
lines can be painted on the track with the centers so chosen, or that
any existing lane lines are properly painted. Remember to use "FIRST
RADIUS" data for checking the portions of the curve at each end and
"SECOND RADIUS" data for the center portion. It will also be necessary
to establish the points where the curvature shifts from one radius to
another. This is done, setting the instrument on the radius points at
the ends of the curve (C1 and C1'), by shooting an angle equal to
"ANGLE TO SECOND CURVE" from each of the reference lines and making
marks on the curb or inside lane line and on the outer border and
snapping a chalk line between them. If the first curve radius is large,
the junction point can be obtained by setting up over radius point C2
and turning an angle of 90 +"ANGLE TO SECOND CURVE" from the line to
the point C2 at the other end. The entire process just completed is now
repeated at the opposite end of the track.
Except as indicated above for portions of the curve with large radii,
when marking lane lines for painting it will be necessary to measure
from the radius point corresponding to the portion of the curve being
worked, shifting from one point to another at the marks on the track
put down for this purpose. Again, be sure to use "FIRST RADIUS" data
for end portions and "SECOND RADIUS" data for the center portion. To
get marks square with the lane lines, chalk lines are run from the
radius point of the particular part of the curve on which the mark is
located.
IX. STEEPLECHASE
Computomarx Steeplechase Courses are designed to correct the two chief
problems in constructing a steeplechase course. These problems are: (a)
Accurate measurement of the water jump approach and return so that a
true 3000 m is run. Previously, it had been necessary to measure the
approach and return with a wheel, or else to drive a number of pins in
these paths the required distance (30 or 20 cm) out from the curb or
painted line and measure around them with a tape. Neither method can
produce proper accuracy, and all errors in measurement are multiplied
by seven since the water jump is negotiated seven times. (b) The
joining of the water jump approach and return to the main track such
that no abrupt changes in curvature or "corners" are present.
(Mathematically speaking, so that there is a continuous derivative
going from track to water jump path and back again) Such improper
joining of approach and return to the main track requires the athletes
to slow down and run wide twice each time the water jump is negotiated.
Obviously this condition results in slower times for the race.
Computomarx Steeplechase Courses solve both of these problems using
three types of courses. All Computomarx Steeplechase Courses can be
described by mathematical formulae. It is therefore possible to
calculate by computer the arc length of the approach and return paths
with great precision. The parameters describing the various paths are
chosen so that the approach and return join smoothly with the track and
water jump.
Three types of steeplechase courses are available. They are a) the
Computomarx elliptical path course, b) a path composed of circular arcs
joined by a straight section, and c) a path consisting of extended
straightaways with circular arcs of the same radius as that of the main
track joining the jump. The three types of paths are show in the
illustrations below.
All three Computomarx Steeplechase Courses are applicable to any
installation in which the water jump is located on either turn, whether
inside or outside the track. In the discussion below reference lines
are cited under the assumption that the water jump is on the second
curve as the rules prescribe. At some installations the water jump is
placed in such a position or with its longitudinal dimension at such an
angle to the track as to make it mathematically impossible to calculate
elliptical steeplechase paths. If an elliptical path was selected in
this situation, the program automatically calculates a circular arcs
joined by a straight section steeplechase course.
A. OBTAINING MEASUREMENTS FOR INPUT
Six measurements (or four in the case of an extended straightaways with
circular arcs course) must be made at a facility before the Computomarx
program can calculate the paths for approach to and return from the
water jump, location of the starting line, positions on the track for
the other barriers, and split points. These measurements correspond to
the six (or four) inputs required in item 16 of the "TRACK
SPECIFICATION SHEET." These measurements are similar whether the water
jump is located inside or outside the track, or which type of
steeplechase course is selected. The angles required to locate these
points may be made by either chord measurement or counterclockwise or
clockwise angle measurement, depending on which type of measurement has
been selected for output.
1. CHORD MEASUREMENT
Fig. 6-A illustrates the method of obtaining inputs using chord
measurement. C1 and C2 are chords from Reference Lines B and C,
respectively, to the points where the paths to and from the water jump
leave and join the track, respectively. For the extended straightaways
with circular arcs course these measurements are not required because
this course always leaves and joins the track at the ends of the curve.
These chords are measured between points on the outer edge of the curb
or inside lane line if no curb is present, on the track. As in all
Computomarx measurements, a positive number is used for measurement in
the direction of running (counterclockwise) and a negative number for
measurement opposite the running direction (clockwise). In some rare
cases, both the point of departure and the point of juncture will be on
the same side of the midpoint of the curve. In these cases, both C1 and
C2 will be measured from the same reference line, if Additional
Reference lines are not selected.
Fig. 6-A. Obtaining Steeplechase Input With Chord Measurement
Measurements R1 and R2 are radii from the center of the curve (or
mid point between opposite side centers for tracks with compound radius
curves). R1 is measured to the point directly below the approach side inner corner of the
water jump barrier. R2 is measured to the return side inner corner of the
water jump where it reaches track level.
For water jumps inside the track, these radii are extended to the outer
edge of the curb or inside lane line on the track and marks are placed
at these points. For water jumps outside the track, marks are made
where the radii intersect the outer edge of the curb or inside lane
line.
C3 and C4 are chords measured from the the marks associated with R1 and
R2, respectively, located in the preceding paragraphs, to the closest
reference line in each case. These measurements must, of course, follow
the usual sign rule convention. Note that it is again possible for both
of these chords to be measured from the same reference line, especially
if Additional Reference Lines are employed, in which case measurement
will typically be from Additional Reference Line F. Because of the
potential for ambiguity, it is necessary to indicate the reference line
from which the chord is measured when using the Alternate Reference
Line option.
2. ANGLE MEASUREMENT
Fig. 6-B illustrates obtaining inputs using angle measurement. Radii R1
and R2 to the points on the water jump structure are obtained in the
same
manner as in the preceding section.
A1 and A2 are angles from the appropriate reference line to the points
of departure and juncture, respectively (these measurements omitted in
the case of the extended straightaways with circular arcs course) about
the center of the curve (or
mid point between opposite side centers for tracks with compound radius
curves). If
counterclockwise measurement is used, these angles will be measured
from Reference Line B and be positive. If clockwise measurement is
selected, measurement will be from C and be negative. A3 and A4 are the
angles to the points on the water jump structure associated with R1 and
R2,
respectively, measured using the same convention.
Fig. 6-B. Obtaining Steeplechase Input With Angle Measurement
B. MARKING THE STEEPLECHASE COURSE
The measurements made in Section IX, A are input into the Computomarx
program. The program then calculates the appropriate parameters for the
approach to and return from the water jump that smoothly join with both
the main track and water jump corresponding to the type of steeplechase
course selected.
The paths thus calculated are not the lines placed down, but rather are
the theoretical lines 30 or 20 cm out from the curb or inner line along
which distance is calculated.
To stripe the steeplechase paths, the program must determine the
location of the physical curb or painted line. For the Computomarx
elliptical path course the program must compute perpendiculars to the
elliptical segments at a large number of points and locate other points
on these perpendiculars 30 or 20 cm inside the elliptical segments,
depending on whether or not a curb is present, for the paths to and
from the water jump. For the other two types of courses, the physical
lines are just arcs of radii 20 or 30 cm less than the theoretical
radii. The Computomarx program smoothly joins the physical curbs
or painted lines of the main track and the paths to and from the
water jump, in accord with IAAF guidelines. The measure lines will not
be continuous at the point of juncture for a facility with a curb on
the main track and none for the water jump paths.
The IAAF recommends that lines for exterior water jump paths be dashed
when these paths are constructed without a raised curb. These lines are
indicated by dashes in the drawing.
1. THE COMPUTOMARX ELLIPTICAL PATH
a. Chord Measurement
Fig. 7-A illustrates the method of placing down marks for the
elliptical steeplechase course using chord measurement. A chord and
radius process is used that is essentially the inverse of the process
used in Section IX, A, 1. For both approach to and return from the
water jump, chords, under the headings "APPROACH" and "RETURN",
respectively, are measured from either Reference Line B or C (or
Alternate Reference Line F, if that option is selected), using the
usual sign convention. For each chord, a tape is stretched from the
center of the circle (or mid point between opposite side centers for
tracks with compound radius curves) through the chord just determined
and a mark is placed a distance from the center equal to the
corresponding distance, given under "RADIUS" on the printout. The
process is the same regardless of whether the water jump is located
inside or outside the track.
Fig. 7-A. Lay Out of Elliptical Steeplechase Course With Chord
Measurement
b. Angle Measurement
Fig. 7-B illustrates the method of placing down marks for the
elliptical steeplechase course using angle measurement. Points on the
paths to and from the water jump are laid out on the track the same as
in Section IX, B, 1, a, except that angles are measured about the
radius point of the circle (or mid point between opposite side centers
in the case of compound curves) either counterclockwise from Reference
Line B or clockwise from Reference Line C.
Fig. 7-B. Lay Out of Elliptical Steeplechase Course With Angle
Measurement
2. CIRCULAR ARCS JOINED BY STRAIGHT SECTION STEEPLECHASE COURSE
A circular arcs joined by straight section steeplechase course consists
of portions of arcs of circles, tangent to the curve of the main track,
leading to and returning from the water jump. A straight segment
passing along the inner edge of the water jump and tangent to both arcs
joins the two circular portions. A circular arcs joined by straight
section steeplechase course is shown in Fig. 8. A surveying instrument
is required to lay out such a course.
It is easy to lay out a circular arcs joined by straight section
steeplechase course. With the instrument set up on the center of the
curve (or mid point for tracks with compound curves) shoot angles equal
to "ANGLE TO POINT OF DEPARTURE
FROM TRACK"
and "ANGLE TO POINT OF JUNCTION WITH TRACK." These angles are labeled
A1 and A2, respectively, in Fig. 8. Next, under "APPROACH," from the
appropriate radius point measure
"DISTANCE TO CENTER OF CIRCULAR PATH," labeled C1 in Fig. 8, in the
direction of the point of departure, or 180 degrees from that
direction, depending on whether the sign of
"DISTANCE TO CENTER OF CIRCULAR PATH" is positive or negative,
respectively. This sign will be positive for water jumps located inside
the track and negative for outside water jumps. This measurement is
made from the radius point of the curve for non compound curve tracks,
and from the radius point of that portion of the curve which includes
the point of departure for compound curve tracks. Then, moving to
the
point just determined, lay down the arc of a circle of radius "RADIUS
OF CIRCULAR PATH", labeled R1 through an angle equal to "ARC OF
CIRCULAR PATH," labeled A3, from the point of departure.
Fig. 8. Layout of Circular Arcs Joined by Straight Section Steeplechase
Course
Next, repeat the above process for the return side at the angle A2
using the data under "RETURN." For the return side, "DISTANCE TO CENTER
OF CIRCULAR PATH", "RADIUS OF CIRCULAR PATH", and "ARC OF CIRCULAR
PATH" are labeled C2, R2, and A4, respectively, in Fig. 8. As on the
approach side, if the track has a compound curve, measurement must be
made from the radius point of that portion of the curve which includes
the point of junction. Connecting
the arcs with a straight line completes the job of laying out the
circular arcs joined by straight section steeplechase course.
3. EXTENDED STRAIGHTAWAY AND CIRCULAR ARC JOINING WATER JUMP
STEEPLECHASE COURSE
The third type of path is most often encountered in the case of an
exterior water jump, although it can also be used for interior jumps.
With the third type of path, the straightaways are extended (or
shortened, if the water jump is interior) by an amount such that an arc
having the same radius as the raised curb or painted line in the first
lane (except for tracks with compound curves, see below) will intersect
the water jump. For some tracks with compound curves the straightaway
will be shortened even in the case of an exterior water jump. A
properly aligned water jump will permit arcs swung from a single point
to intersect the nearer corners of both the approach and return sides
of the jump. If an arc swung from a point which just intersects the
inside corner of the nearer side is within 10 cm of the inside corner
on the other side, only a single extension (shortening) is used. If the
water jump is not aligned well enough to permit this, separate
extensions (shortenings) are used for the approach and return sides. In
either case the radii of the circular portions of the path are the
same, the radius of the curb or inner painted line, except in the case
of compound curves which use "RADIUS OF CIRCULAR ARC" indicated on the
printout and measured from the mid point between opposite side centers.
Care must be taken to align the center(s) of the path arcs with the
centers of the main curves (or mid point between opposite side
centers). If an EDM is used, one should set up on the center at the
opposite end of the track from the water jump and sight past the other
center, measuring the additional distance(s) past the second center
indicated in the printout as "LENGTH OF STRAIGHTAWAY EXTENSION" or
"LENGTH OF APPROACH (RETURN) SIDE STRAIGHTAWAY EXTENSION." If an EDM is
not used, a line should be stretched from the center on the opposite
side, passing over the other center, and the extension(s)
[shortening(s)] carefully measured along the line. Similar procedures
should be followed for determining the intersections between the
extensions (shortenings) and the arc portions of the paths. For
example, set the EDM on the intersection of Reference Line A and the
curb or the outer edge of the inside lane line. Sight past the
intersection of Reference Line B and the curb (or outer edge of the
inside lane line) and measure past that point the amount indicated.
Fig. 9. Layout of Extended Straightaway and Circular Arc Joining Water
Jump Steeplechase Course
4. LOCATING BARRIERS, STARTING LINES, AND SPLIT LOCATIONS
The locations of the four non-water jump barriers are calculated by
dividing the length of the lap, including the water jump, (which will
be shorter or longer than a lap on the track, depending on whether the
water jump is inside or outside the track) by five and spacing the
other barriers (three before the water jump and one after) by this
amount.
Points denoting the location of barriers are measured in the first
lane, with one mark placed just outside the curb or inside lane line,
and a second located a distance equal to the width of the base of the
barrier out from the first and at right angles to the lane lines, and
are located using the chosen measuring system (chord or angle). Arc
starting lines are located as in Section VI. If the option for youth
events is selected, additional starting lines are calculated for the
2000 meter and 1500 meter youth events (only the 2000 meter starting
line is drawn).
Split locations are given for the benefit of coaches and athletes who
may wish to know and/or call out intermediate times during the race.
Split locations are measured in the inside lane and are denoted by
short marks just outside the curb or inside lane line.
For facilities with the water jump outside the track, splits under the
heading "DISTANCE RUN" may be located on the paths to and from the
water jump, or on the water jump itself. If the location of a split is
past the point of departure and before the point of return, the split
will be located on one of the paths or on the water jump. Points to be
so located are denoted by an asterisk (*) in the printout. These points
are located by first measuring the chord or angle indicated on the
printout, measuring chords on the main track
. The split location is then determined by the intersection of a line,
running from the center of the curve (or mid point for compound curves)
through the point determined by the chord or at the indicated angle,
with the path or water jump.
X. SPECIAL OPTIONS
A. ALTERNATE HURDLE LANES AND HURDLE OPTIONS
Some tracks have lanes that are too narrow for hurdles to be set in
them. To run 300 and 400 m intermediate hurdle races on such tracks, a
fewer number of wider hurdle lanes have to be established and marked on
the track. Generally, tracks with lanes less than 1.07 m wide will
require special hurdle lanes. It is easy to determine how many hurdle
lanes such a narrow laned track can have. Simply divide the width of
the track in meters by 1.07, and drop any fractional part. The result
goes in the second blank of item 4 of the form "TRACK SPECIFICATION
SHEET."
When alternate hurdle lanes are selected, the program calculates inside
lane line radii for these lanes, and staggered start data for the
hurdle races which use them. If the track has a compound radius curve
with a portion having a large radius as discussed in Section VIII and
hurdles are located on the portion with the large radius, the distance
from the mid point M is printed in addition to the chord or angle from
the appropriate reference line.
It is not suggested that the hurdle lane lines actually be painted
down. This would cause too much confusion. It is best to simply mark a
spot on the track using the lane radius and hurdle location data
indicating where to spot each hurdle. Staggers can be painted on the
track between the theoretical hurdle lane lines at the locations given.
If the U.S. High School events only option (item 12) is selected, the
400 meter hurdles are omitted from the calculations and drawing. All
countries except the U.S. run 300 meter hurdles for youths over hurdles
set on the marks for the last 7 hurdles of the 400 meter event. Only in
the U.S. is the race run using hurdles spaced the same as the first 8
in the 400 meter race. Item 14 allows unneeded separate 300 meter marks
to be deleted. Item 14 also allows a straightaway youth hurdle event of
variable length, number of hurdles, distance to the first hurdle, and
hurdle spacing to be specified. Finally, item 14 provides the option of
starting the 300 hurdles in a chute, rather than on the circumference
of the track.
B. ALTERNATE STRAIGHTAWAY LANES
The Computomarx program permits a number of options for the
straightaway events. These options may be selected using items 4
through 8 on the Specification Sheet. Items 4 and 5 respectively allow
the number and width of straightaway lanes to be greater than the
number and width of lanes around the circumference of the track. Item 6
allows the finish line for the straightaway events to be at a different
location than the common finish for events run on the circumference and
permits them to be run in the opposite direction. Item 7 defines, when
more or wider straightaway lanes are selected, whether the home
straight is aligned with the inside or outside edge of the rest of the
track. Item 8 is an option which produces calculations and markings on
the drawing for straightaway events on the backstretch. Events on the
backstretch may be run in either direction and have their finish line
at an arbitrary location.
C. RELAY OPTIONS
Item 13 on the "TRACK SPECIFICATION SHEET" allows the customer the
choice of a two or three turn stagger for the 4X400 m relay. A three
turn stagger on a 400 m track means that the first exchange is
staggered and runners on the second leg break for the pole after
running one turn. It is strongly recommended that a three turn stagger
be selected. Not only is this the way that the race is run in all major
meets, including the Olympic Games, but running a three turn stagger
eliminates the confusion of trying to break for the pole while
completing an exchange, which occurs when a two turn stagger is used.
Item 13 also allows the customer to select "additional relay events."
If this selection is made in the case of an outdoor track, the program
makes calculations and marks on the drawing for the sprint medley relay
and the 4X1500 m relay. The sprint medley is assumed to be run in the
order 200-200-400-800, with the first two exchanges staggered and a
break for the pole after the 400 runner has run one turn. The same
starting staggers are used as for the 4X400 m relay, but an additional
staggered zone is calculated for the first exchange. The zone for the
second exchange is the same as the zone for the first exchange of the
4X400 relay but require that additional fly marks be calculated. (The
sprint medley can also be run off of the same staggers and use the same
first two zones as the 4X200, assuming the track is 400 m. However, the
4X200 staggers and zones do not incorporate the distance required for a
break for the pole. Thus, all staggers except lane one would be result
in too long a distance being run and legs would be of incorrect length,
and the discrepancy would increase in going from the inner to the outer
lanes.)
The 4X1500 m relay uses the same arc starting line as does the 10,000 m
(assuming a 400 m track), but requires three new non-staggered exchange
zones, the first near Reference Line C, the second near Reference Line
B, and the third near Reference Line A. (Again assuming a 400 m track.)
If the selection for "additional relay events" is made in the case of
an indoor facility, calculations are performed for the 4X200 m relay.
The 4X200 is assumed to be run with a three turn stagger (for 200 m
tracks), and a staggered first exchange zone. The second and third
exchange zones are non-staggered. Staggered fly marks are calculated
for the first exchange zone, and it is recommended that they be painted
using smaller versions of the mark denoting the beginning of the zone.
A non-staggered fly line (or lines for non 200 m tracks) is calculated
for the second and third exchange zones of this race. It is recommended
that this line be dashed.
XI. CONSTRUCTION INFORMATION
An essential part of bidding any athletic facility is determining the
surface area. Track and field facilities require a great deal of
expensive material, so it is essential that the surface area be
determined accurately. The Computomarx program accurately calculates
the area of the track including chutes and additional straightaway
lanes.
Before the area of the oval can be calculated, it is necessary to
establish the radii of the inner and outer edges of pavement. These
radii will not be the radii of the inside lane line and the outer
border. It is impossible to pave exactly to a given line so that the
pavement looks as though it were formed by a cookie cutter. An
exception is when a permanent raised curb of concrete or other material
is constructed inside or outside the track. Then the edge of pavement
will be the same as the inside lane line or outer border radius. For
installations with either a removable curb of aluminum or other
material, or no curb, an allowance must be made for a 5 cm (2 in)
painted line inside the inner lane line. The program allows a total of
30 cm (1 ft.) for paving irregularities and the inner painted line. The
30 cm is apportioned 17.5 cm (7 in) on the inside providing 5 cm (2 in)
for the line plus 12.5 cm (5 in) for inside paving irregularities
with another 12.5 cm (5 in) on the outside for paving irregularities
there.
The inner and outer edges of pavement are printed on the first page of
the calculations as "INNER EDGE OF PAVEMENT" and "OUTER EDGE OF
PAVEMENT" under the heading "CONSTRUCTION INFORMATION."
The areas of chutes are calculated assuming that chutes extend 10
meters back beyond the start of the 110 meter hurdles. If the track is
wider on the straightaways than on the curves due to more or wider
lanes on the straight, the area due to the extra width is calculated
assuming the wider area extends 20 meters past the finish line and
tapers smoothly to the width on the curves over the next 20 meters.
If the track has a permanent raised inner curb, the program will
overestimate the area by approximately 70 square meters or 83 square
yards for a 400 meter track.
The total track surface area (excluding runways and high jump area) in
both square meters and square feet is printed on the first page of the
calculations as "TOTAL TRACK SURFACE AREA" under "CONSTRUCTION
INFORMATION."